
News
How to Maintain Waxless Skis (part 2)
January 2, 2009
How to prepare the ski and apply glide wax
Go to Part One | Go to Part Three
The five minute method is to purchase glide wax paste, of which several brands are available. The paste is applied with the included applicator, and then worked into the base with a rubbing cork (sometimes sold with the paste). This method of waxing your cross country skis is arguably not as durable and will require more frequent applications during the season. However, it is enormously convenient and will produce results that any novice or recreational skier will be pleased with. It is also an excellent choice for packing on a back-country trip. Remember to keep the wax away from the kick zone of the ski.
 Hot waxing is the preferred method used by competitive skiers, and typically provides more durable and penetrating results. This method requires the following tools and supplies: Block of glide wax; waxing iron, preferably for skis, but a clothes iron will do (with caution); scraping tools, typically plastic, though steel may be used (also with caution); 200 and 400 grit sandpapers; base cleaner (denatured alcohol will suffice); clean rags; and brass, horsehair and nylon brushes for structuring, if you wish to tackle that aspect of ski waxing.
First, remove the coarse edges from scratches and gouges by lightly spot sanding with a small piece of 150 or 200 grit sandpaper, but do so sparingly. Often, a scratch will leave a ribbon of plastic that is only half connected to the base. Remove this loose plastic with a small putty knife if the sandpaper does not do the job. Follow up each spot with 400 grit sandpaper (this will allow re-structuring of the base), and then move to other, minor scratches with the 400 grit. Never sand across the width of the ski! Only sand back and forth along the length! When completed, you should have sufficiently removed the raised portion of the scratches (plastic that is actually displaced to above the base). If the skis have not been waxed before, use clean rags to thoroughly wipe down the base with base cleaner or alcohol. If the skis have been waxed before, cleaning is often done by quickly waxing the ski with a soft wax and removing it while still warm.
Applying hot glide wax
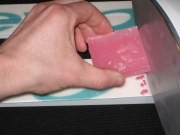
After cleaning the skis, hold the surface of the warm iron perpendicular to the base of the skis as they rest supported on a table or between two chairs, base side up. Press the block of wax against the iron, allowing the wax to drip onto the ski base. Keep the iron at the coolest possible temperature at which the wax effectively melts --if the wax smokes, the iron is far too hot, and you risk ruining the wax, or damaging the skis.
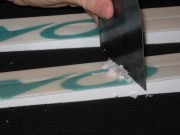 Once the ski has sufficient blobs of wax dripped onto the glide areas (but NOT the kick-zone!), press the iron against the base, moving back and forth with a smooth slow motion, melting the wax into the ski. The wax will float itself across the entire surface. After the ski has cooled for at least ten minutes, use a scraper to remove the excess wax, pulling the scraper lengthwise down the ski. Adjust the angle you hold the scraper if it seems to "bounce" down the base. Before you have done the final scrapings, be certain to also scrape the wax from the groove in the middle of the ski. Many scrapers have a rounded corner for this, but plastic dowel rods for this purpose are also available. In a pinch, a penny firmly held at a slight angle will do the job. As you continue scraping the glide area, don't be afraid to scrape too much --the wax you want to ski on is in the base more than it is on it. If you seem to have under applied the wax, simply re-apply more wax the way you did at first. New skis are often waxed 5 times in a row to ensure good absorption by the base --you can't over wax!
Structuring the Base
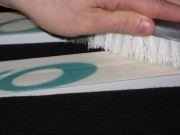 If you wish to tackle structuring the base wax, then begin by determining what conditions you will be skiing in. For cold, conditions, use a nylon brush and brush the length of the ski, removing loose wax and smoothing the surface. If conditions require (below 15 degrees F), you may further polish the surface with a white ScotchBrite pad. If the conditions are warming, with the snow becoming wet (26 degrees F), reveal the structure of the waxed base with your brass brush, followed by the horsehair brush. Advanced techniques for structuring (topics such as rilling angles, brushing techniques, and specialty brushes) won't be discussed here, but be aware that structuring is an art and a science that can greatly improve your glide performance in all snow conditions.
--AK